NAS backup was introduced back in v10. At the time I published a small article about how to backup a VSAN based file share using Veeam Backup & Replication (VBR) that you can read here. A lot of things changed since v10 in terms of features added to NAS backup. The new release will add support for direct to object storage backup and immutability just to name a couple.
The architecture stayed fundamentally the same since the release and its main components can be seen in the following diagram :
File share - storage device where our protected data (files) resides.
File proxy - backup proxy that runs the data mover service, reads data from the file share and sends it to the backup repository.
Cache proxy - dedicated component in NAS backup architecture to keep metadata about the protected sources. The cache holds temporary data and is used to reduce the load on the source during backups.
Backup repository - storage location for the backups
Backup server - controls and coordinates jobs and resource allocation
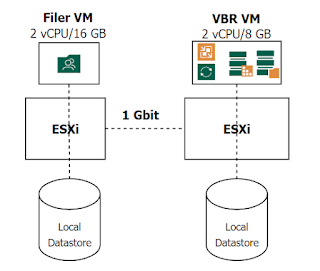
In a large environment the components will be sized and distributed accordingly on different machines. The lab setup is a bit different: All Veeam components on the same machine. As source we have installed a True NAS VM serving 2 NFS file shares
To populate the file shares we've used a simple bash script similar to the code below. To make it faster, we've used multiple scripts that we ran in parallel.
#!/bin/bash

for i in {1..100000}
do
    head -c 2K /dev/urandom > /mnt/filer/lots_of_files/2K_file_$i
done
The lab setup has limitations coming from ethernet connectivity between hosts, Intel NUC resources (SCSI interfaces of the local datastores, CPU and RAM) and resources allocated to the VMs.
VBR Configuration
We will start preparing VBR for NAS backups. Add the required Veeam roles: NAS backup proxy and cache repo. Then we will connect the NFS shares to the server. For brevity of the post, steps in the wizard where no changes are done will be skipped.
NAS Backup Proxy
In our scenario with all in one VBR deployment, the NAS backup proxy role will be installed by default on the backup server.
In case you would add the proxy role(s) on different machines, then you would need to start the "Add proxy" wizard from "Backup Infrastructure"
Select "General purpose backup proxy"
Then choose your server to which you want to assign NAS proxy role. If the server you want is not in the list, press Add new to start adding it as a managed server. We've only lowered the number of max concurrent tasks due to lab resources availability. Normally you keep default settings.
Next follow the wizard's screens and install the proxy role.
Add Cache Repository
Cache repo role should be as close as possible to proxy and source. It holds metadata in memory, hence having a fast disk is not mandatory. In lab we install it on backup server VM, but in a prod environment you should move it to another machine to avoid resource competition (or size you backup server to accommodate the cache repo). To create a cache repo, go to Backup Repositories and start Add Backup Repository wizard and follow the wizard. No special configuration is needed.
Select direct attached storage
Select repo OS
Give the repo a name
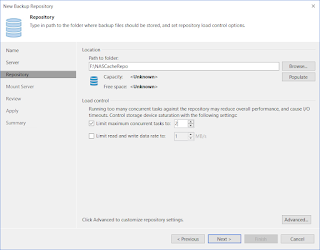
Select the managed server where to install the cache repo and disk location for the repo (press Populate button). It needs only a few GB of free space. If the server you want is not in the list, press Add new to start adding it as a managed server.
Choose the folder for the repo
Use the default settings until the end of the wizard. It will install the transport service,
Add file shareWe are using NFS shares served from a TrueNAS VM. We'll go to "Inventory" and start "Add File Share"
Enter the NFS path to the share. Here you can also select advanced settings on how to process the file share - directly from the filer or using a snapshot of the share
Next select to use any available proxy or specific one. In case you have a distributed architecture with multiple sites, you would select here the proxies closer to you share. Also, the cache repo and how aggressive you want the backup job to be are configured on the same step.
Finally, install Veeam components and finish adding the share.
Backup repository From the point of view of a backup repository there is no difference in v12 between a NAS job and a VM image one. Any available repository can be used now including direct to object storage and hardened repository. Just pick your favorite.
Now you are ready to create the backup job - in this post A Look at Veeam Backup & Replication v12 NAS Backup - Creating file share backup job


