It's not enough to have a backup of your data. You need to make sure that you will be able to recover from that backup when the time comes. And one of the best ways to make sure you can do it, is to make protect your backups from being modified intentionally or unintentionally.
In Veeam Backup & Replication, a hardened repository is using a Linux server to provide immutability for your backups. The feature was first released in version 11. Let's see what makes the hardened repository special, how it protects your backups from changes and how easy is to actually start using it
Immutable file attribute
Linux file system allows setting special attributes to its files. One of these attributes is immutable attribute. As long as it is set on a file, that file cannot be modified by any user, not even root. More, root user is the only user that can actually set and unset the immutable attribute on a specific file. You can do it using lsattr and chattr commands in Linux as seen in the below screenshot:
Veeam hardened repo uses exactly the same mechanism of making backup files immutable.
Isolate Linux processes
To run a successful repository, Veeam needs several functionalities: to receive data from proxies, to open and close firewall ports, to set and unset immutability as per retention policy. In order to harden the repository, Veeam implements these functionalities as separate Linux processes.
The processes that sets and unsets immutable attribute on the backup files is called veeamimmureposvc and it needs to run with root privileges, as root user is the only user that can modify immutable attribute.
veeamtransport --run-service is the Data Mover service performing data receiving, processing and storing. Because it is a service exposed on the network, it is running under a standard Linux user. In case of a breach, the service will give access only to a standard user with limited privileges. The Linux user under which this service runs must not be allowed to elevate its privileges.
A third process takes care of dynamically opening and closing firewall ports: veeamtransport --run-environmentsvc and this one is also running with elevated privileges.
The following screen shot shows the three main services that are part of a hardened repository.
Single use credentials
Another layer of protection is added through the way the credentials are handled within the backup server.
To add the Linux repo to the backup server you need to specify Linux credentials. These credentials are only used during the initial configuration process and they are never stored in backup server's credential manager. Temporary privilege elevation may be needed during the repository configuration for deployment and installation of Veeam processes. After the configuration process finishes, all elevated privileges must be revoked from the user.
Additional repository features - fast clone
This one is not a security related feature, but it comes in as a great add on to the hardened repository.
In case you formatted your file system with XFS file system and you have a supported Linux distribution (see this user guide page for more details), Veeam will use fast clone to reduce used disk space on the repository and increase the speed of synthetic backups and transformations. Fast clone works by referencing existing data blocks on the repository instead of copying the data blocks between files.
Using the hardened repository
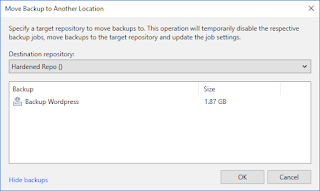
For new backup jobs, just point them to your hardened repository. In case you have existing backups then you need to migrate those to your new repo. With v12 comes a new feature that allows to move any backup from an existing repository to another one. Simply select your backup, right click it and you will see that now you can "move backup"
Let's look at moving backups from a Windows NTFS repository to our hardened Linux repo. We start with an empty repository configured with a service account called veeambackup
The first backup chain is for an unencrypted backup job. The backup job is configured to use a standard Windows repository. There are 2 full restore points in the backup chain. Each restore point is 960 MB and the total size on disk is 1.87 GB. We use "move backup" to send the the backup chain to the hardened repository:
In this post we've looked at the features of hardened repository and how they work. To implement a hardened repository in your environment follow the steps in the user guide


No comments:
Post a Comment