Saturday, April 28, 2018

PowerCLI - Batch migrate VM network adapter

Back to VMware basic operational tasks: I had to migrate VMs from one network to another, which roughly translates to changing the portgoups Pretty simple and straightforward. Since the task was for several VMs, I automatically excluded clicking through the UI. That sent me to PowerCLI and now the simple task became a bit more complicated because instead on relying in real time on my hand-eye coordination for changing a portgroup, I would have to rely on an input file.

The input file is in CSV format and has four columns: VM name, source portgroup, destination portgroup and reboot (boolean value to see if reboot the VM or not). You may ask why using the source portgroup as input - I am using it to check that the VM actually has one network adapter connected to that portgroup and I am not randomly migrating everything I find on that VM.

The CSV file looks like this:
vmName,srcPg,dstPg,reboot
vm-1abc*,pg-prod-101,pg-prod-110,false
vm-2def*,pg-prod-101,pg-prod-110,false

I am also using wildcards in the name of the VMs. The reason behind this is the VMs have a very long and randomly generated name which is different from the hostname. For example, actual VM name is vm-1abc-yetcg-93763-andbv-34781, while hostname is vm-1abc. How I am checking that the wildcard does not match multiple VMs, you will see in the description below.

The migration script does the following:
  1. takes as input the CSV file and tries to load and read the CSV file; if it fails, it will exit the execution
  2. for each line in the CSV file it searches the VM in vCenter server inventory
  3. once the VM has been uniquely identified, it searches for a network adapter connected to source portgroup as defined in input file; it doesn't find it or finds multiple portgroups, it does not process the VM
  4. once the source portgroup is identified it changes the network adapter mapping to destination portgroup (as defined in input file)
  5. if reboot is required, it will issue a soft reboot to the VM
  6. and it goes to the next VM in the list

And now the code: as usual, please use it carefully as it has not been tested for all situations. Also, PowerCLI session from where the script will be run needs to be connected to vCenter Server as the script does not handle this. 


 1
 2
 3
 4
 5
 6
 7
 8
 9
10
11
12
13
14
15
16
17
18
19
20
21
22
23
24
25
26
27
28
29
30
31
32
33
34
35
36
37
38
39
40
41
42
43
44
45
46
47
48
49
50
51
param(
 [Parameter(Mandatory=$true)][string]$csvVmList
)

function VmChangeNetwork($vmName,$srcPg,$dstPg,$reboot){
  Write-Host "processing:" $vmName
  Write-Host "  src PG:" $srcPg "dst PG:" $dstPg "reboot required:" $reboot

  Try {
      $v = Get-VM | Where {$_.Name -like "$vmName"}
  }
  Catch {
    Write-Host $_.Exception.Message $_.Exception.ItemName
  }

  if ($v.Count -eq 1){
    $srcPgExist = $v  | Get-NetworkAdapter | Where {$_.NetworkName -eq $srcPg}
    if ($srcPgExist.Count -eq 1) {
      $v  | Get-NetworkAdapter | Where {$_.NetworkName -eq $srcPg} | Set-NetworkAdapter -NetworkName $dstPg -Confirm:$false
      if (($reboot.ToLower() -match "true") -and ($v.PowerState -match "PoweredOn")){
        Write-Host " rebooting VM"
        Restart-VM -VM $v -RunAsync -Confirm $False
      }
    } elseif ($srcPgExist.Count -eq 0) {
      Write-Host " no adapters connected to" $srcPg "found"
    } else {
      Write-Host " multiple adapters connected to" $srcPg "found"
    }


  } elseif ($v.Count -eq 0) {
    Write-Host " "$vmName "was not found"
  } else {
    Write-Host " "$v.Count "VMs found with name" $vmName
  }
  Write-Host ""
}

# load CSV file
Try {
  $vmList = Import-Csv $csvVmList
}
Catch {
  Write-Host -foregroundcolor red " File is not accessible"
 exit
}

# process VMs
foreach ($vm in $vmList){
  VmChangeNetwork -vmName $vm.vmName -srcPg $vm.srcPg -dstPg $vm.dstPg -reboot $vm.reboot
}

Wednesday, April 11, 2018

Veeam Backup and Replication - Infinidat Integration

Starting with Update 3 (U3), Veeam Backup & Replication (VBR) offers a built-in integration framework for storage systems called Universal Storage Integration API. Storage vendors can use the API to develop plugins and integrate their storage systems with VBR. This is a huge step into extending the ecosystem of storage vendors that offer advanced functionality with VBR.

As of the writing of this article,  the following storage systems are already supported:
  • IBM Spectrum Virtualize (since December)
  • INFINIDAT InfiniBox (since March)
  • Pure Storage FlashArray (since April) 
(Later edit: first storage vendor supported via the API was IBM, but it is integrated in U3 release)
The following article presents the integration with Infinidat InfiniBox.

I will not go into the details of installation and configuration of InfiniBox. The post covers only Veeam part

First, download the Infinidat plugin from Veeam site. Login to VBR server, close VBR console, make sure processes/jobs are not running, extract the zipped file and run the installer. If you connect remotely to VBR, then run the installer on the machines from where you connect, too. It's a next, next, next process (as seen in the following series of pictures):


Now, getting to the fun part. Open VBR console, go to Storage Infrastructure > Add Storage - there it is, Infinidat Infinibox is available:


Add storage hostname (or IP address):

Add storage credentials:

Select the protocol to use (in lab I am using only iSCSI), the volumes to scan and the proxies to use (I have left everything on automatic):

Review the summary, press Finish and wait for the successful installation:


It is time to test the newly configured storage. First, let's create a job that uses Backup from Storage Snapshots. Since using integrated storage snapshots is active by default, there is no need to configure anything special for this job. Just select the VMs from InfiniBox datastore and run the job. Looking at the logs we see that "storage snapshot" is being used for backup:

Another type of job is to use only snapshots, although this is not a proper backup solution (since both the source VM and the backup reside on the same storage). To make a backup job snapshot only, you need to select as destination repository the InfiniBox storage (not a VBR repository):

This time when the job runs, it will create a snapshot directly on the storage:

The snapshots will appear under Home - Backups:

As well as under Storage Infrastructure:

Now, it's time for you to test the recovery :-)

Wednesday, April 4, 2018

Veeam ONE Custom Reports

I was recently asked if Veeam ONE could also create a custom reports, such as an inventory list of the VMs and their configuration.

Veeam ONE does come pre-loaded with a lot of reports. But if none of those reports are satisfying, then you can create your own.

To do this, first we login to Veeam ONE Reporter and go to Workspace tab. In the left pane, under My Reports, we create a folder (not mandatory, but a good practice to keep things separated).


Next we see a preexisting folder, Custom reports. We open folder and select "Custom Infrastructure" report which allows to define our own parameters.


The selected scope is Virtual Infrastructure and allows to select from all the objects. We are interested in vSphere Virtual Machine, but it could be any vSphere (or Hyper-V) inventory object.


Next we select the parameters to display, for our case: VM name, number of vcpus, memory size, disk size and IP address. The window allows for real time filtering of the available parameters (makes life easier than scrolling through a long list):


In case we are looking for something specific (let's say VMs that have the letters "vbr" in their name and less than 32 GB of RAM) we can actually create a custom filter and only those VMs will be displayed.


Cool, right? To make it even more flexible we can group the VMs based on one of the properties (for example memory size) and we can also choose to sort the lists. After we finished tweaking with the report, it's time to save it (to the folder created earlier).


After the report is saved, we go to the location of the report and run it (of course it can be edited, copied, deleted or scheduled to run periodically and sent as attachment to an e-mail address)


And the result of running the report is:


This is just an example on how to use custom reports. The power of Veeam ONE comes from letting you choose any parameter from the monitored infrastructure (virtual and backup) and use it in your own custom report.

Thursday, August 17, 2017

vRealize Business update checking hangs

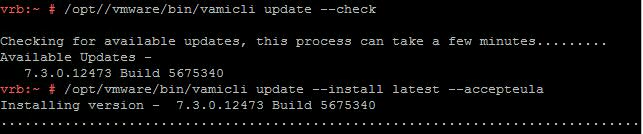
Trying to update vRealize Business 7.2 I noticed that it hangs during update check with the message "Checking for available updates...".

No matter what I did - changed the update options, reboot the appliance - didn't help. Looking on communities.vmware.com I found the post 477322 which presented the same behavior, only for vCenter Server Appliance and it was from 2014. So I tried (a bit skeptically) to start the update from CLI as suggested in the post:

  • ssh to vRB appliance 
  • /opt/vmware/bin/vamicli update --check
  • /opt/vmware/bin/vamicli --install latest --accepteula
And it worked:

I suppose this workaround can be applied to most of the appliances. 

Monday, August 14, 2017

New and cool features in vRealize Automation 7.3 - parameterized blueprints

vRealize Automation 7.3 has been released for a few months, but only last week I got time to update the lab and take a more serious look at it. And I really liked what I saw.

One of the first features that I saw made me smile because I remembered the times when clients requested it and I was going through the processes of explaining that it is possible, but it will need some customization and some workflow development. Now, in 7.3 there are parameterized blueprints which allows to define t-shirt sizes for VMs, It also provides image parameters - how that image is being built. This way the configuration of the VM can be hidden from the service consumer and using image parameters organization policies can be implemented without the need to create new blueprints. You could have only one Windows template that provides 2012, 2012 R2 and 2016 as simple as selecting from a drop down menu. 

In the end, the user gets the possibility to select whatever OS version is entitled to and the t-shirt size of that deployment.   

Let's see how we can get to this nice item request screen.

First we define the parameters. In vRA portal, go to Administration -> Property Dictionary -> Component Profiles. There are two component profiles already defined: Image and Size. 

We need to edit each one. By default, the component profiles have no values defined. Edit Size profile where we will configure CPU, memory, storage for vSphere virtual machines to be used in blueprints. Go to Value sets tab and press New:

Type in a display name (what the service consumer will see in the request form), a description (optional), configure the values for CPU, memory and storage and select the status (by default it is active and it can be used in blueprints). Press Save if you want to add more value sets or Finish to save and exit. Once a value set has been defined, it can be edited, deactivated or deleted.

Now let's define value sets for Image component profile and configure the build information for vSphere VMs. It is the same build information that traditionally configured at each blueprint's level, but this time it is defined as a series of parameters. Edit Image component profile, go to Value Sets tab and press New:

Type in the name display name, a description and then select how to build the VM. In my case, I've  selected Linked Clone and filled in the necessary parameters: VMware template to clone from, the snapshot to use, customization specification name. All other options existing in a blueprint still available:  create, clone, NetApp flex clone. 

Once we have defined the value sets and made them active, we can use them in blueprints. 

Go to Design - Blueprints and there is the choice to either modify and existing blue print or create a new one. I will modify an existing blueprint, since I want to reduce blueprint sprawl :-) 
Go to Design - Blueprints - Edit, in the blueprint select the vSphere machine component and on the tab go to  Profiles.

By default, no component profiles are selected, press Add and select which component profiles to use: Size, Image or both. 

Press OK and select from each component profile the value sets to use for this particular blueprint. I've used only two of the t-shirt sizes (large and xlarge) and selected large to be the default one:

Press Finish to save and exit. Since the blueprint was already published, we can go directly to Catalog and request the Item using the new t-shirt sizes. For a new item, you need first to publish it, map it to a service and ensure the users are entitled to request the item. 

Thursday, May 4, 2017

Virtual Machine Encryption

A new security feature introduced in vSphere 6.5 is virtual machine encryption. The encryption is VM agnostic as it takes place at hypervisor level before the I/O is stored to disk. It uses vSphere APIs for I/O filtering framework that allows interception of VM I/Os in the virtual SCSI emulation (vSCSI) layer. It encrypts virtual machine files (nvram, vswp), virtual disk files and core dump files. However it does not support log files, VM configuration files or virtual disk descriptor files since these are considered to contain non-sensitive data.

How it works

There are several components necessary to implement VM encryption. The process uses two different sets of keys - key encryption keys (KEKs) and data encryption keys (DEKs). The components are:
  • external key management server (KMS) - generates and stores key encryption keys (KEKs) 
  • vCenter Server - requests KEKs from KMS and distributes them to ESXi hosts; Key Management Interoperability Protocol (KMIP) v1.1 is supported
  • ESXi hosts - generates data encryption keys (DEKs) and encrypts them with KEK; encrypted DEKs are stored in configuration files. DEKs are used to encrypt/decrypt virtual machine files. KEKs need to be in ESXi memory for a VM to be powered on.

Since KEKs are only stored in KMS and they are used to encrypt/decrypt DEKs, KMS should be made highly available. Loosing KMS generated keys means DEKs cannot be decrypted and access to VM data is gone.

Another important aspect is VM encryption uses the data block's address to protect against snooping by generating different encrypted data for identical data blocks. However it does not provide protection against data corruption.

How to configure

First we need to configure KMS solution. For demo purpose I've used the docker container created by William Lam. Please note that the keys for this KMS are held in memory and they will be lost on restart. To configure it, logon to your docker host and start the docker image with KMS by running the following commands:
docker pull lamw/vmwkmip
docker run -d -p 5696:5696 law/lamw/vmwkmip

Check the container is running by executing the following command on the docker host: docker ps. 

Next configure vCenter Server. Login to web client, select the vCenter Server in Hosts view, go to configure tab, Key Management Servers and press Add KMS. In the window add the KMS cluster name, server alias, server address, TCP port and optionally proxy details:

Press Yes to set the KMS as your default KMS cluster:

Trust the certificate presented by KMS:

vCenter Server is now configured to use KMS and the details are displayed in the web client:

To encrypt a VM becomes a matter of applying the correct storage policy to the VM. Before applying the encryption policy make sure the VM is powered off, otherwise you will get the following error:


To change the storage policy, in web client right click the VM you want to encrypt, go to VM Policies -> Edit VM Storage Policies. Change the default policy with VM Encrpyption Policy (which is the default encryption policy) and press OK button:

The encryption process will take some time. You can monitor it in events log:


Once the process is finished you can power on the VM. On the summary tab of the VM you can also check that the VM is encrypted:

Access control
Since cryptography is used when one needs to restrict access to certain data, the question is do we need all admins to have access to cryptographic functions in vCenter Server. To restrict access, a new role has been introduced - No cryptography administrator. It does not have the following privileges: 

  • Cryptographic Operations
  • Global.Diagnostics
  • Host.Inventory.Add host to cluster
  • Host.Inventory.Add standalone host
  • Host.Local operations.Manage user groups

To further restrict the access, the role can be cloned and modified accordingly.

Interoperability
The are restrictions and limitations when VM encryption is being used. One of the most important is that backup solutions using VMware vSphere Storage API - Data Protection are restricted to hot add backup and NBD-SSL network transport mode. SAN backup is not supported.

VMs with existing snapshots cannot by encrypted. All snapshots must be first consolidated. Guest memory cannot be saved during a snapshot of encrypted VMs.

Performance
If you are looking for details on performance impact of VM encryption, there is a performance study from VMware. Dedicated encryption hardware is not necessary, but using a processor that support AES-NI instruction set will speed up encryption and decryption.

Tuesday, April 18, 2017

Updating vSphere 6.5 with vSphere Update Manager

Update Manager has been and is the tool for upgrading and patching ESXi hosts, virtual appliances and VMs. There was only one caveat: it needed a Windows server to run on. It needed it, because starting with version 6.5, vSphere Update Manager is no longer dependent on Microsoft Windows. Update Manager 6.5 is embedded in vCenter Server Appliance 6.5 and uses the internal vPostgres database. The Windows offering still exists, but now there is a choice between going all Windows or all Linux.

From the point of view of functionality, one of the features Update Manger offers is orchestrated ESXi host updates. Since I got a few questions related to host updates, I will describe in the post how to do the update. In my case I updated from vSphere 6.5 to 6.5a. Not a big step, but enough to prove a point.

I've started by downloading the latest ESXi ISO from VMware site, then logged in vCenter Web Client and uploade the image in Update Manager. In Web Client go to Home - Update Manager - Manage tab - ESXi Images and select Import ESXi Image. Browse to the location of the ISO image and upload it.

After the upload is successful, the image will be displayed in the list imported images. Select it and you can see the software packages that are included in the image:

Now the desired image is in the repository. To use the image, we need to attach it to a baseline. Then the baseline will be attached to the hosts or clusters that we want to update. Right click on the image and select create baseline, type the name of the baseline, optionally add a description and press OK. 

The baseline is displayed in Hosts Baseline tab:

Attach the new baseline to cluster of hosts. In Web Client go to Home - Hosts and Cluster, right click cluster, in the action list go to Update Manager and select Attach Baseline. Select the appropriate baseline an click OK. Next, go to Update Manager tab and press Scan for Updates to check the compliance status of the hosts in the cluster.

After the scan finishes, the Non-Compliant message is displayed and we can start the remediation process. Pressing Remediate starts the wizard. First, select the baseline to apply (there might be other baselines attached to the hosts). 

Then select the targets, in my case I've selected all the hosts in the cluster:

Accept the EULA, go to Adanced options and schedule the remediation to take place during a specific maintenance window or whether to ignore warnings that may appear during update. In this case we'll run the remediation immediately:

On Host remediation options select what to do with the VMs when hosts are put into maintenance mode: leave them on, suspend or power off. Removable media mounted to VMs can be automatically disabled. In case entering maintenance mode fails, we can specify how many times to retry and how long to wait between retries. The settings can be saved as default host remediation options for future upgrades.

Finally, the Cluster remediation options enables changes at cluster level - disable DPM, disable Fault Tolerance, disable HA admission control. Powered off and suspended VMs can be migrated to other hosts in the cluster while a host enters maintenance mode. Finally you may select to enable parallel cluster remediation and to specify how many hosts to process in parallel or let Update Manager decide the number based on the cluster settings. Parallel remediation is applied only on hosts where VMs are powered off or suspended. Also, VSAN cluster allows only for one host to be in maintenance mode at a time. Hosts in VSAN cluster will be updated sequentially.

If remediation is sequential and one of the host fails to enter maintenance mode, Update Manager will report an error and stop the remediation process. When parallel processing is selected, if Update Manager encounters an error, it ignores the host and it continues with the next host in the cluster. 

On the summary page you can run a a pre-check remediation report which will provide information about issues with the environment and will suggest what changes to apply:

Press OK and the remediation process will start. At the end of the process, the status of overall compliance in Update Manger tab will display Compliant.